Introduction to Oreo Balls
If you haven’t tried Oreo Balls yet, you’re in for a delightful treat! These bites of bliss are a simple yet indulgent dessert that have taken social gatherings by storm. With just a few ingredients, you can create a food experience that has your friends and family raving. But what makes these yummy morsels so special?
What are Oreo Balls and why are they a hit?
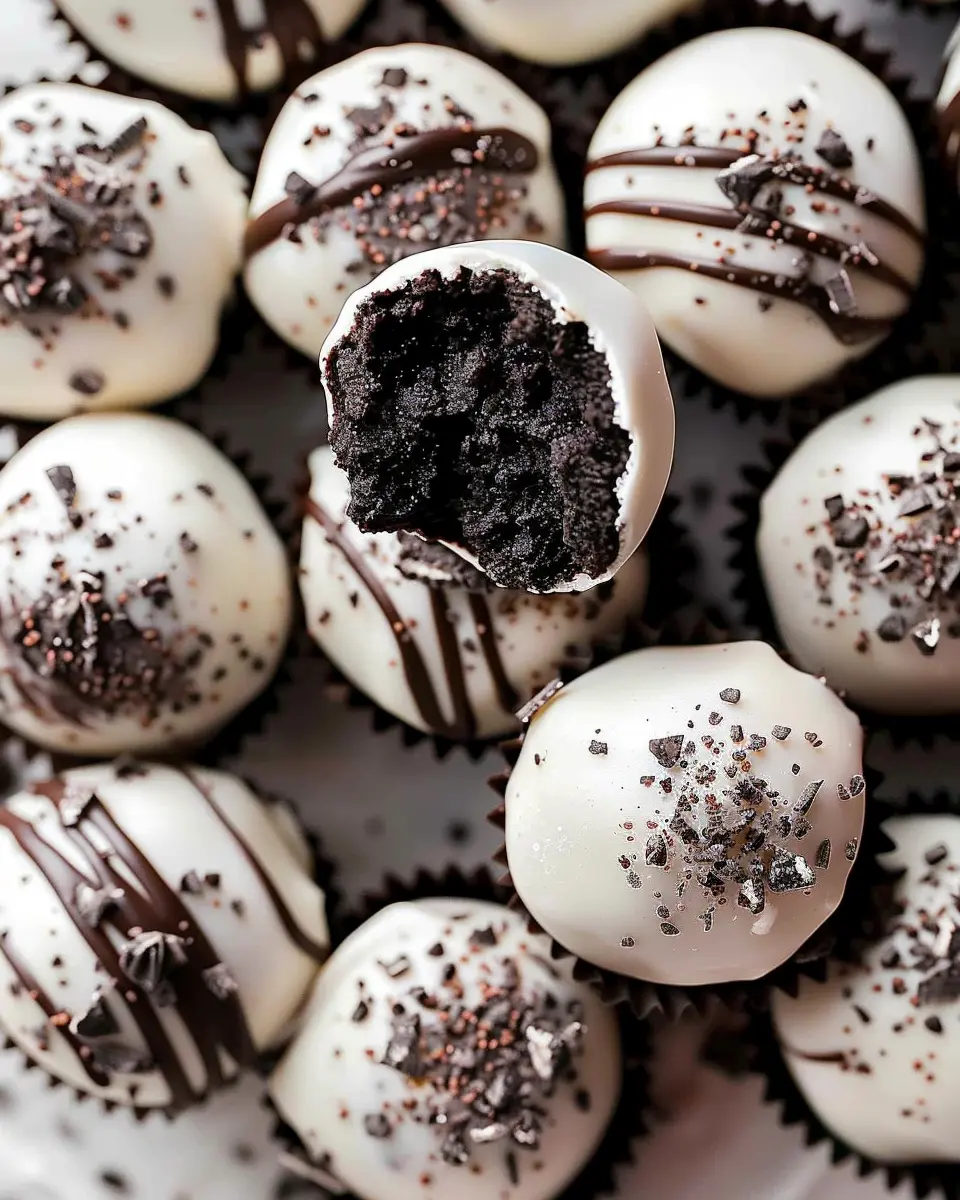
At their core, Oreo Balls are decadent chocolate-covered bites made primarily from crushed Oreos and cream cheese. Yes, it’s that easy! All you need to do is mix crushed Oreos with softened cream cheese, roll them into small balls, and dip them in melted chocolate. It’s a foolproof recipe that’s not only enjoyable to make but is also perfect for any occasion—birthdays, holidays, or just a cozy night in.
But what’s the secret behind their popularity? Here are some reasons why Oreo Balls have become a favorite dessert choice:
- Simplicity: You don’t need to be a master chef to pull this off. The recipe is straightforward, making it accessible for all skill levels.
- Crowd-Pleaser: Who can resist the classic combination of Oreo cookies and chocolate? Their rich flavor profile appeals to both kids and adults, making them ideal for parties.
- Customizable: You can easily add your twist with different coatings, such as white chocolate or sprinkles, or even mix in different flavors to the Oreo base. Check out ideas on Taste of Home for more inspiration!
Moreover, these Oreo Balls can easily be made ahead of time and stored in the fridge, allowing you to focus on enjoying your event rather than worrying about dessert. As a bonus, they hold up well, so you can whip up a batch and store them for later enjoyment.
So, whether you’re looking for a quick dessert to impress or just a sweet treat to satisfy your cravings, Oreo Balls are a surefire way to bring joy and sweetness into your life. Ready to dive into the recipe? Let’s get started!

Ingredients for Oreo Balls
Creating delightful Oreo Balls at home is not only easy but also a fun activity to engage in, either solo or with friends. Here’s what you’ll need to whip up this crowd-pleaser:
- Oreo Cookies: The star ingredient! You’ll need about 36 Oreo cookies, which you can finely crush to form the delectable base.
- Cream Cheese: An 8-ounce package of softened cream cheese works wonders to bind the crushed Oreos together, giving them that rich, creamy texture.
- Chocolate Melts: For the outer coating, choose either milk chocolate or dark chocolate melts. About 1-2 cups should suffice, depending on how thick you want the coating.
- Optional Toppings: Feel free to get creative here! You might want to add sprinkles, crushed nuts, or drizzles of white chocolate for extra flair.
These Oreo Balls are perfect for various occasions and can even be modified with different toppings. Want to learn more about dessert ideas? Check out resources like Taste of Home for additional inspiration!
Preparing Oreo Balls
Making Oreo Balls is a delightful journey that ends in the creation of an indulgent treat, perfect for parties, gifts, or even a cozy night in. Let’s walk through the process step-by-step, ensuring that you not only get delicious results but also have fun along the way!
Gather Your Ingredients
The first step in preparing Oreo Balls is to gather all your essential ingredients. Here’s what you’ll need:
- 1 package of Oreo cookies (about 14.3 oz.)
- 8 oz. cream cheese, softened
- 2 tablespoons of butter, melted (this adds richness)
- 1-2 tablespoons of milk (optional, for consistency)
- 12 oz. chocolate chips (dark, milk, or white – your choice!)
- Optional toppings: crushed Oreos, sprinkles, or chopped nuts for that extra flair
Make sure to have these items ready before you dive in. It’ll make the process smoother and more enjoyable! If you’re looking for quality Oreos, check out Nabisco’s official site for deals or product information.
Process the Oreos
Using a food processor, break down the Oreo cookies into fine crumbs. This is a great opportunity to let out any stress—just think of all your worries getting smashed along with those cookies! If you don’t have a food processor, you can definitely place the cookies in a plastic bag and crush them with a rolling pin. Just ensure they’re ground as finely as possible to create a homogeneous mixture.
Mix in Butter and Milk
Once you have your cookie crumbs, it’s time to add the softened cream cheese and melted butter. This step will make the mixture creamy and pliable. If it appears a bit dry, don’t hesitate to add one or two tablespoons of milk to achieve your desired texture. Mix everything together thoroughly until it’s well-combined; all those Oreo crumbs should be beautifully coated!
Shape the Oreo Balls
Now comes the fun part! With clean hands, scoop out about a tablespoon of the mixture and roll it into a ball. Continue this process until you’ve formed all the dough into delicious little orbs. Feel free to adjust the size according to your preference; larger balls can be a more decadent treat, while smaller ones can be great for snacking.
Chill Before Dipping
Your Oreo Balls need a little time in the fridge to firm up. Place them on a baking sheet lined with parchment paper, then chill for about 30 minutes. This step reduces the risk of them falling apart when you dip them in chocolate later.
Melt the Chocolate
While the Oreo Balls chill, it’s time to melt your chocolate. You can use a microwave or a double boiler to do this. If using a microwave, heat the chocolate in short bursts of 20 seconds, stirring in between to prevent burning. Ensure it’s completely smooth before proceeding. If you’re into more advanced techniques, you might consider tempering your chocolate for a fancy finish—check out this guide on tempering chocolate for tips!
Coat the Oreo Balls
Once your chocolate is melted and your Oreo Balls are chilled, it’s time to dip! Use a fork or a toothpick to dip each ball into the melted chocolate, ensuring they’re fully coated. Tap off the excess chocolate gently, then place them back on the parchment-lined baking sheet.
Add Toppings and Chill Again
Before the chocolate sets completely, sprinkle any desired toppings (like crushed Oreos or sprinkles) on top. This is where you can get creative! Let the coated Oreo Balls chill in the fridge once more for about 30 minutes or until the chocolate hardens.
And there you have it—Oreo Balls that are perfect for all occasions! Whether you’re enjoying them yourself or sharing with friends, these treats are bound to impress. Enjoy the rich, indulgent flavors and the satisfying crunch!

Variations on Oreo Balls
When it comes to Oreo Balls, the classic combination of crushed Oreos and cream cheese is just the beginning. Why not shake things up a bit? Here are three delicious variations that will satisfy different cravings and make your treats stand out at any gathering.
Cookie Butter Oreo Balls
If you’re a fan of cookie butter, this variation is a must-try! Simply substitute the cream cheese for cookie butter. Mix 1 package of crushed Oreos with about 1 cup of cookie butter until combined. Roll into balls and dip in white chocolate. The result? A creamy, spiced delight that’s perfect for any occasion. You can find more about the magic of cookie butter here.
Peanut Butter Oreo Balls
Think of this as a match made in dessert heaven. Replace the cream cheese with creamy peanut butter to create Peanut Butter Oreo Balls. Just like before, blend together 1 package of crushed Oreos with 1 cup of peanut butter. Roll into balls, dip in semi-sweet chocolate, and sprinkle with crushed peanuts for an extra crunch. This combo not only tastes amazing but adds a flavor complexity every peanut butter lover craves.
Mint Oreo Balls
Feeling fresh? Try Mint Oreo Balls! Use mint-flavored Oreos and mix with cream cheese, rolling them into balls just like the classic version. Dip in dark chocolate and add a dash of crushed peppermint on top for that perfect minty kick. These little bites are not only festive but also an instant mood lifter.
By experimenting with Oreo Balls, you can easily customize flavors to cater to any palate. Which variation will you try first?
Tips and Notes for Oreo Balls
Best chocolate for melting
When making Oreo Balls, the type of chocolate you choose can really make or break your treat. Opt for high-quality chocolate like Ghirardelli or Wilton’s candy melts, as they melt smoothly and provide a rich flavor. Avoid chocolate chips; they contain stabilizers that can result in a clumpy texture. For a twist, try using white chocolate or even colored candy melts to match themes or occasions!
How to store Oreo balls
Storing your delicious Oreo Balls properly is key to maintaining their delectable taste. Keep them in an airtight container in the refrigerator for up to two weeks, or freeze them for longer storage. When freezing, layer them with parchment paper to prevent sticking. Just remember to let them thaw a bit at room temperature before indulging, as this enhances their flavor and texture.
For more ideas on storing treats, you can check out helpful storage tips from sources like Good Housekeeping or Food Network.

Serving Suggestions for Oreo Balls
Perfect for parties
Oreo Balls are the ultimate crowd-pleaser at any gathering. Whether it’s a birthday bash or a spontaneous get-together, these bite-sized treats fit seamlessly into the snack lineup. Consider a creative display; arrange your Oreo Balls on a tiered cake stand for an eye-catching centerpiece. If you’re feeling adventurous, customize your Oreo Balls with festive toppings like crushed nuts or colorful sprinkles—perfect for the holiday season!
Great as gifts
Looking for a thoughtful gift for a friend or colleague? Homemade Oreo Balls are a sweet surprise that shows you care. Package them in a decorated box or mason jar, and add a personalized note to elevate your gift. Not only are they delicious, but they also come with a personal touch that store-bought treats simply can’t match. For ideas on packaging and presentation, check out resources like The Kitchn and Martha Stewart.
Incorporating Oreo Balls into your entertaining strategies or gifting plans will certainly add a delightful element. Enjoy crafting, and watch your friends and family smile with every bite!
Time Breakdown for Oreo Balls
Preparation time
Making Oreo Balls is a breeze! You’ll need about 20 minutes to gather your ingredients and mix everything together. Just crush the Oreo cookies, blend with cream cheese, and roll into balls. Easy-peasy!
Chilling time
Once you’ve shaped your Oreo Balls, the next step is crucial: chilling. Let them set in the freezer for at least 30 minutes. This helps maintain their perfect shape and texture, making them unforgettable when you take a bite!
Total time
All in all, your total time investment for these delightful treats is about 50 minutes. In under an hour, you’ll have delicious, bite-sized indulgences that are perfect for any occasion. Whether you’re hosting a party or just treating yourself, these Oreo Balls will definitely impress!
For more tips on desserts, check out Serious Eats for expert advice!
Nutritional Facts for Oreo Balls
When you’re indulging in homemade Oreo Balls, it’s good to know what you’re enjoying. Let’s break down the nutritional aspects of these delightful treats!
Calories
Each Oreo Ball packs in around 90 calories. If you’re watching your caloric intake, it’s wise to portion them out because they can be surprisingly easy to overconsume, especially during gatherings.
Sugar Content
These treats do contain a bit of sweetness! A single Oreo Ball typically has about 7 grams of sugar. That’s not a huge amount, but it can add up if you’re enjoying a few. For those looking to keep their sugar intake in check, consider using sugar-free options or pairing them with fruits.
Protein
While not a primary source of protein, one Oreo Ball offers approximately 1 gram of protein. If you’re looking to boost the protein content, consider adding in some crushed nuts or even pairing your Oreo Balls with a protein-rich snack like Greek yogurt for a tasty and balanced treat.
Explore More
For more information on balanced eating, check out resources from the Harvard School of Public Health and consider visiting MyFitnessPal to track your dietary needs. Enjoy your Oreo Balls responsibly!
FAQs about Oreo Balls
When it comes to Oreo Balls, this beloved treat often sparks a flurry of questions. Let’s dive into some of the most common inquiries!
Can I use gluten-free Oreos?
Absolutely! You can create delicious gluten-free Oreo Balls by substituting regular Oreos with gluten-free Oreos. Many brands offer gluten-free varieties, and the taste will be just as delightful! If you’re preparing for someone with gluten sensitivities, always check the packaging to ensure there are no cross-contamination concerns.
How do I make Oreo Balls vegan?
Transforming your Oreo Balls into a vegan-friendly treat is quite easy! Instead of using cream cheese, you can substitute it with dairy-free cream cheese or even coconut cream for a unique twist. Just crush the Oreos, mix in your chosen vegan alternative, and coat them in dark chocolate—voila! You’ve got a scrumptious vegan dessert that everyone will love. For more detailed guidance, consider checking out resources on vegan baking from the Vegan Society.
What’s the best way to store leftovers?
Leftover Oreo Balls can definitely be a sweet treat for later! Store them in an airtight container in the refrigerator, and they’ll last about one to two weeks. If you’d like to keep them around longer, you can freeze them for up to three months. Just make sure to separate layers with parchment paper to prevent sticking. When you’re ready to indulge again, simply let them thaw in the fridge for a few hours or enjoy them straight from the freezer!
By addressing these common questions, we hope you feel more equipped to whip up your Oreo Balls with confidence!
Conclusion on Oreo Balls
Final thoughts on enjoying Oreo balls at home
Oreo Balls are not just a treat; they’re a delightful experience you can create in your own kitchen. Perfect for gatherings or simply for satisfying a sweet tooth, these little bites of joy are quick and easy to prepare.
Imagine surprising your friends with homemade Oreo Balls – they’ll be impressed and you’ll feel like a culinary star. Plus, you can customize them with toppings or fillings to add your personal touch.
For more sweet treats, consider exploring options like chocolate-covered strawberries or peanut butter cookies. They offer a similar fun factor and are crowd-pleasers too! Enjoy every crumb!
PrintOreo Balls: The Easy Indulgence Everyone Will Love

Oreo Balls are a delightful treat that combines the rich flavors of Oreos and cream cheese, coated in chocolate.
- Prep Time: 20 minutes
- Cook Time: 0 minutes
- Total Time: 1 hour
- Yield: 24 balls
- Category: Dessert
- Method: No-Bake
- Cuisine: American
- Diet: Vegetarian
Ingredients
- 1 package Oreo cookies
- 8 ounces cream cheese, softened
- 1 cup chocolate chips
Instructions
- Crush the Oreo cookies into fine crumbs in a large mixing bowl.
- Add the softened cream cheese and mix until well combined.
- Form the mixture into balls and place them on a baking sheet.
- Melt the chocolate chips and dip each ball in the chocolate to coat.
- Chill in the refrigerator until the chocolate hardens.
Notes
- For a fun twist, sprinkle crushed Oreos on top of the chocolate before it sets.
Nutrition
- Serving Size: 1 ball
- Calories: 100
- Sugar: 8g
- Sodium: 50mg
- Fat: 5g
- Saturated Fat: 3g
- Unsaturated Fat: 1g
- Trans Fat: 0g
- Carbohydrates: 12g
- Fiber: 1g
- Protein: 1g
- Cholesterol: 15mg