Introduction to Oreo Balls
What are Oreo Balls and why they’re the perfect treat?
If you haven’t heard of Oreo Balls, you’re in for a delightful surprise! These little indulgent bites are a heavenly combination of crushed Oreo cookies and cream cheese, all rolled into a bite-sized treat and coated in chocolate. It’s hard to resist their charm, especially when they can be made in just a few simple steps.
So, why are Oreo Balls the perfect treat? For one, they cater to all kinds of occasions. Whether it’s a birthday party, holiday gathering, or just a cozy night in, these delectable morsels are sure to please any crowd. They require minimal effort, making them perfect for young professionals who want to impress without spending hours in the kitchen.
But let’s talk about taste—these bites deliver an explosion of chocolatey goodness with each bite! The smooth cream cheese filling complements the cookie crunch, resulting in a rich texture that keeps you coming back for more. According to a survey by The Daily Meal, desserts that combine cookies and cream are among the most requested sweets at gatherings throughout the year. It’s no wonder Oreo Balls have become a staple treat!
Here’s another bonus: they’re incredibly customizable! You can switch up the chocolate coating to white chocolate or even colored melts for festive occasions. Toss in sprinkles, crushed nuts, or coconut flakes for that extra something special. The best part? They can be made ahead of time and stored in the fridge for when those sweet cravings hit.
As you embark on the journey of creating your own Oreo Balls, remember that it’s about the joy of baking and sharing with friends. Trust me, once you make your first batch, you’ll quickly become the designated dessert-maker among your circle. So let’s dive into this simple recipe and create something delicious together!

Ingredients for Oreo Balls
Creating delicious Oreo Balls requires just a handful of ingredients, making it an easy treat for any occasion. Here’s what you’ll need:
-
Oreo Cookies: The star of this recipe! You’ll need about 36 regular-sized Oreos. Their rich chocolate flavor is key for that indulgent experience.
-
Cream Cheese: A popular choice for many dessert treats, 8 ounces of softened cream cheese will help bind your Oreo Balls together while adding a creamy texture.
-
Chocolate Coating: Choose 12 ounces of chocolate chips or melting chocolate. You can opt for semi-sweet, dark, or even white chocolate! This will provide a delightful crunch and sweetness to the exterior.
-
Decorative Toppings (optional): Consider crushed Oreos, colorful sprinkles, or melted chocolate for drizzling over the top. These can elevate the visual appeal and add a personal touch.
With these simple ingredients, you’re on your way to crafting these irresistible treats. For more ideas on how to customize your Oreo Balls, check out this recipe on Food Network. Remember, the fun of this recipe lies in personalizing it, so let your creativity shine!
Preparing Oreo Balls
Making Oreo Balls is an incredibly fun and rewarding endeavor, perfect for celebrating a special occasion or simply enjoying a delicious treat with friends and family. Let’s dive into the simple yet delightful steps of preparing these tasty bites!
Gather your ingredients
Before you start your Oreo ball journey, it’s essential to assemble all your ingredients. Here’s what you need:
- Oreo cookies – about a standard package (usually around 14-15 ounces)
- Cream cheese – softened (8 ounces)
- Chocolate chips (dark, milk, or white, depending on your preference) – about 2 cups
- Sprinkles or crushed Oreos (optional, for decoration)
- Cooking spray (optional, for easy removal)
Having everything laid out in front of you makes the process much smoother and helps to keep distractions at bay.
Crush the Oreo cookies
Now it’s time to transform those Oreos into a crumbly, delicious base! You can use a food processor for this, but if you don’t have one, don’t worry—there are other ways to crush those cookies. Place the Oreos in a plastic bag, seal it tightly, and use a rolling pin to crush them into fine crumbs.
Whichever method you choose, aim for a fine crumb consistency as it helps the mixture bind better when you add the cream cheese. This step is where the magic begins—just the smell of crushed Oreos can elevate your mood!
Mix in the melted butter and cream cheese
In a large mixing bowl, combine the crushed Oreos with softened cream cheese. You can melt the butter and add it here if you like extra richness; melted butter also helps achieve that perfect blend. Mix thoroughly until you have a cohesive mixture that is almost dough-like. The Oreo Balls will only taste as good as your mixing skills here, so take a moment to really incorporate the ingredients.
Form the Oreo balls
Once your mixture is ready, it’s time for some hands-on fun! Scoop out about a tablespoon of the mixture and roll it into a ball. Place each ball on a parchment-lined baking sheet. This is also a perfect time to get creative—feel free to adjust the size of the balls to your liking. Want mini ones for a party? Go for it! Bigger ones for a movie night snack? Why not!
Chill the Oreo balls
After forming the balls, pop them in the fridge for about 30 minutes. Chilling is crucial here; it helps the balls firm up and makes them easier to dip in chocolate later on. Use this time to tidy up your kitchen or perhaps enjoy a quick snack.
Prepare the chocolate coating
While your Oreo Balls chill, it’s time to prepare the chocolate coating. You can opt for traditional chocolate chips or try something different like white chocolate or almond bark. Melt the chocolate in a microwave-safe bowl in 30-second intervals, stirring in between until it’s completely smooth. The texture should be a creamy liquid that will adequately coat your balls.
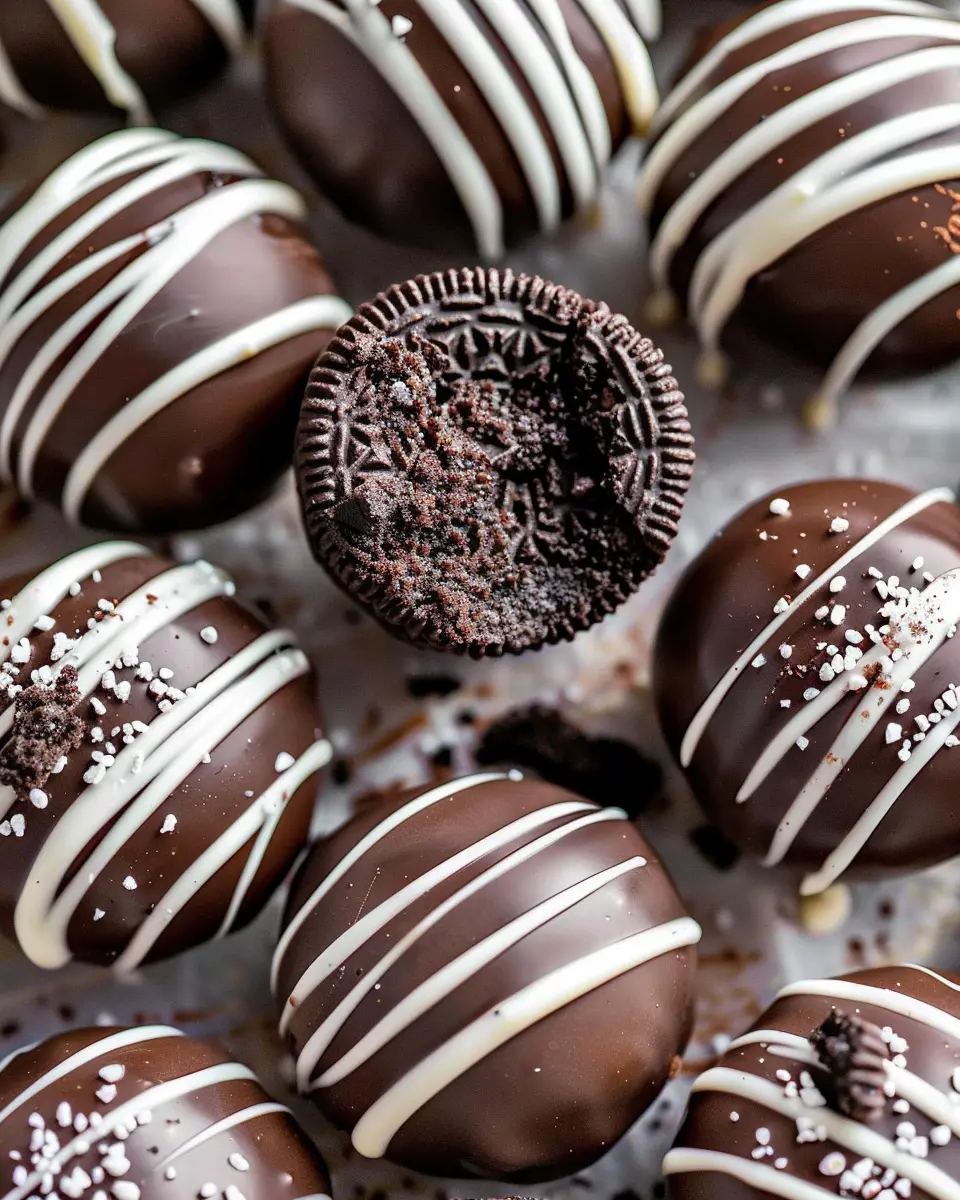
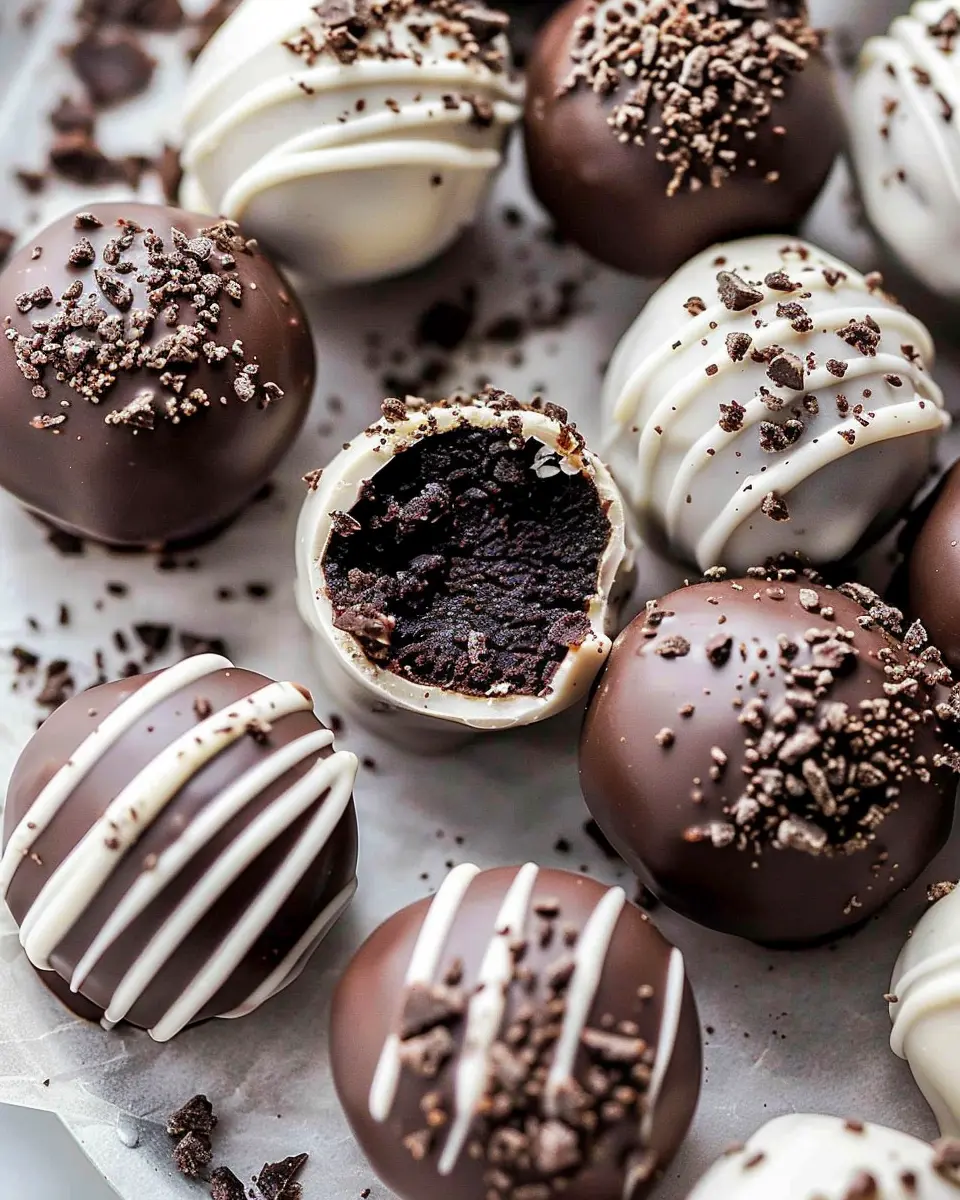
Dip the Oreo balls in chocolate
Once your chocolate is ready and the Oreo Balls are chilled, it’s time for the big dip! Use a fork or toothpick to dip each ball into the melted chocolate, ensuring an even coating. Allow any excess chocolate to drip off before placing the dipped balls back onto the parchment-lined sheet.
Chill again until set
Finally, pop your chocolate-coated Oreo Balls back into the fridge for about 20-30 minutes or until the chocolate has firmly set. If you’d like an added touch, this is a great time to sprinkle them with additional crushed Oreos or colorful sprinkles before they fully set!
And there you have it—your Oreo Balls are ready to enjoy! Perfect for indulging yourself or sharing with friends. For more inspiration on desserts like this, check out sources like Food Network or Bon Appétit. Enjoy your sweet creation!
Variations on Oreo Balls
Oreo balls are versatile little delights that can be dressed up in many ways! Here are a few delicious variations to try that will have your friends and family coming back for more.
Peanut Butter Oreo Balls
If you’re a fan of the classic chocolate and peanut butter combo, these Peanut Butter Oreo Balls are for you! Simply mix crushed Oreos with creamy peanut butter before dipping them in chocolate.
-
Ingredients:
-
1 package of Oreo cookies
-
1 cup of creamy peanut butter
-
2 cups of melted chocolate
-
Instructions:
- Crush the Oreos and combine with peanut butter until well mixed.
- Roll into balls and chill for 30 minutes.
- Dip in melted chocolate and let cool.
Want to elevate the flavor? Consider drizzling some extra peanut butter on top for a gourmet touch.
Mint Chocolate Oreo Balls
For those who crave a refreshing twist, Mint Chocolate Oreo Balls are an amazing option. The combination of mint and chocolate is both invigorating and satisfying.
-
Ingredients:
-
1 package of Mint Oreos
-
1 package of cream cheese
-
2 cups of chocolate for dipping
-
Instructions:
- Crush the Mint Oreos and blend with cream cheese until smooth.
- Form into balls and freeze for about 30 minutes.
- Dip in melted chocolate and allow to set.
Adding a drop of peppermint extract can enhance the minty goodness, making these bites irresistible.
Coconut Oreo Balls
For a tropical twist, Coconut Oreo Balls are the way to go! The flavor of coconut brings a delightful summer vibe, perfect for any gathering.
-
Ingredients:
-
1 package of Original Oreos
-
1 cup of shredded coconut
-
2 cups of white chocolate for coating
-
Instructions:
- Crush the Oreos and mix with shredded coconut.
- Roll into balls and chill for about 30 minutes.
- Coat in melted white chocolate and sprinkle with additional coconut.
These Oreo balls are not just tasty; they’re a feast for the eyes, too! For more exciting recipes or tips on ingredient substitutions, explore resources like Food Network and AllRecipes.
Each of these variations on Oreo balls adds a unique touch, making them a perfect treat for any occasion! So, which one will you try first?
Cooking Tips and Notes for Oreo Balls
Creating delicious Oreo Balls can be a fun and rewarding experience, but here are some handy tips to help you along the way!
Common mistakes to avoid
- Skipping the cooling step: After mixing the cream cheese with crushed Oreos, make sure to chill the mixture before forming it into balls. This helps them hold their shape better.
- Overheating the coating: When melting chocolate for the coating, do so gently to prevent burning. A microwave in short bursts, or using a double boiler works wonders. Check out this guide from Kitchen Tips for more on melting chocolate.
- Not using parchment paper: Lining your tray with parchment paper makes it easy to remove the finished Oreo Balls without sticking.
Substitutions for dietary needs
If you or your guests have dietary restrictions, don’t worry!
- Gluten-free: Use gluten-free Oreos to keep it safe for gluten-sensitive friends.
- Dairy-free option: Substitute cream cheese with a dairy-free alternative and choose dark chocolate that doesn’t contain milk.
- Vegan twist: Aim for vegan cookies and chocolate for a fully plant-based treat.
These adjustments make it easy for everyone to enjoy your Oreo Balls! Happy cooking!
Serving Suggestions for Oreo Balls
Creative Presentation Ideas
When it comes to serving Oreo Balls, presentation can elevate the experience. Consider these unique ways to impress your guests:
- Mini Treat Cups: Place each ball in a colorful mini cup, perfect for parties!
- Chocolate Drizzle: Enhance their appearance with a drizzle of contrasting chocolate (white or dark) on top.
- Themed Toppings: For holidays, use sprinkles or edible glitter that match the occasion, creating a festive look.
Creating a beautiful display makes these delights not just a treat for the palate but a feast for the eyes too!
Pairing Suggestions with Beverages
Wondering what goes well with Oreo Balls? Here are a few beverage pairings that complement their rich flavors:
- Milk: You can’t go wrong with classic milk—its creaminess balances the sweetness beautifully.
- Coffee: A hot cup of coffee or a refreshing iced latte provides a delightful contrast.
- Sparkling Water: For a lighter option, sparkling water with a hint of lemon cuts through the richness nicely.
These pairings enhance the enjoyment and create a balanced sweet treat experience! Want to explore more dessert ideas? Check out Taste of Home for inspiration tailored to your taste buds!
Time Breakdown for Oreo Balls
When you’re looking to whip up some delicious Oreo Balls, understanding the timeline can help streamline your kitchen efforts. Here’s a friendly breakdown of what to expect:
Preparation Time
Setting aside about 20 minutes for preparation will give you enough time to crush the Oreo cookies, mix them with cream cheese, and roll them into balls. It’s an easy and enjoyable process that can even be a fun activity with friends or family.
Chilling Time
After you’ve shaped your Oreo Balls, they need to chill for 30-60 minutes in the refrigerator. This step is crucial as it helps them firm up and enhances the overall texture.
Total Time
In total, you’re looking at about 1 to 1.5 hours to create these delightful treats. Given how quickly they disappear, this time will be absolutely worth it! For more insight on chilling times and other recipes, check out authoritative sources like Food Network and Serious Eats.
Now that you know the timeline, let’s get ready to enjoy some homemade Oreo Balls!
Nutritional Facts for Oreo Balls
When making Oreo Balls, it’s essential to consider their nutritional profile, especially if you’re looking for that perfect balance of indulgence and moderation.
Calories per serving
Each Oreo Ball packs in approximately 150-160 calories. While these little treats are delightful, moderation is key if you’re tracking your calorie intake.
Sugar content
You’ll find around 14-15 grams of sugar in each ball. This sweetness primarily comes from the classic Oreos, so if you’re being mindful of your sugar consumption, perhaps enjoy one or two at a time.
Protein content
Surprisingly, each Oreo Ball has about 2 grams of protein, thanks to the cream cheese used in the recipe. While they’re not a high-protein snack, they do offer a bit of sustenance to keep you going.
For more insights into snacking wisely, check out the USDA guidelines or Harvard Health. These resources offer great information on maintaining balance in your diet amidst the fun treats!
FAQ about Oreo Balls
Can I make these ahead of time?
Absolutely! Oreo Balls are perfect for making in advance. In fact, they can be prepped a day or two before your event. Just mix, shape, and dip them, then store in the refrigerator until you’re ready to serve. This makes them an ideal treat for busy professionals who want to impress without the last-minute stress. I often whip up a batch on Sunday evenings, so I always have a sweet on-hand throughout the week!
How do I store Oreo Balls?
Storing your delightful Oreo Balls is quite simple. Once they’re all dipped and set, place them in an airtight container. You can either keep them in the refrigerator for up to a week or at room temperature for a couple of days if you prefer them a little softer. If you’re looking for a more sleek presentation, consider placing parchment paper between layers to prevent sticking.
Can I freeze Oreo Balls?
Yes, you can definitely freeze Oreo Balls! This is a great option if you’re planning on making a big batch or if you want to save some for later. Just place them in a single layer on a baking sheet to firm up, then transfer them to a freezer-safe container. They can last up to three months in the freezer. When you’re ready to enjoy, just let them thaw in the fridge – they’ll taste just as delicious as when they were fresh!
For more tips on storing treats, check out resources like FoodSafety.gov to ensure you’re doing it right! Happy snacking!
Conclusion on Oreo Balls
Summing up the delight of homemade Oreo balls
Creating Oreo Balls at home is a delightful experience that anyone can enjoy. These little treats, made from simple ingredients, offer a perfect blend of chocolate and creaminess that is hard to resist. The best part? You can customize them to your liking, whether by drizzling extra chocolate or adding sprinkles for some festive flair.
Whether you’re hosting a party or just need a sweet snack, Oreo Balls are an easy go-to that never disappoints. So why not give this recipe a try? You’ll impress your friends and indulge in a deliciously satisfying treat! For further inspiration, check out this Oreo recipe guide.
PrintOreo Balls: Indulgent Treats Anyone Can Make at Home

Oreo Balls are an easy and delicious no-bake dessert treat made with only a few ingredients. Perfect for parties or a sweet snack!
- Prep Time: 20 minutes
- Cook Time: 0 minutes
- Total Time: 50 minutes
- Yield: 24 servings
- Category: Desserts
- Method: No Bake
- Cuisine: American
- Diet: Vegetarian
Ingredients
- 1 package Oreo cookies
- 1 package (8 ounces) cream cheese, softened
- 2 cups chocolate, melted
Instructions
- Crush the Oreo cookies in a food processor until fine.
- Mix in softened cream cheese until combined.
- Roll mixture into small balls and place on a baking sheet.
- Refrigerate for at least 30 minutes.
- Dip each ball in melted chocolate and place back on the sheet.
- Chill again until chocolate is set.
Notes
- For variety, you can use different types of chocolate.
- Try adding sprinkles on top before the chocolate hardens.
Nutrition
- Serving Size: 1 ball
- Calories: 150
- Sugar: 12g
- Sodium: 100mg
- Fat: 10g
- Saturated Fat: 5g
- Unsaturated Fat: 3g
- Trans Fat: 0g
- Carbohydrates: 15g
- Fiber: 1g
- Protein: 2g
- Cholesterol: 10mg