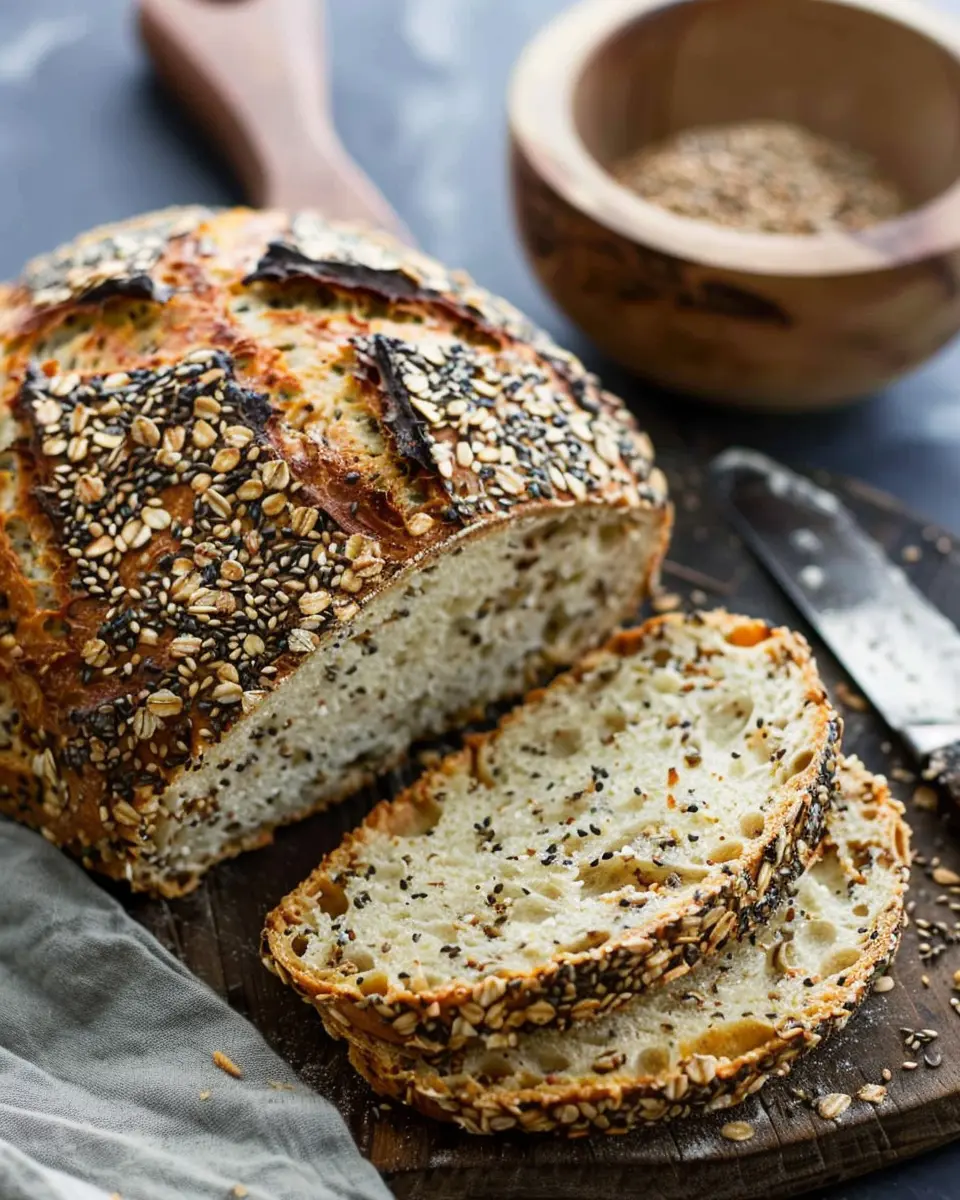
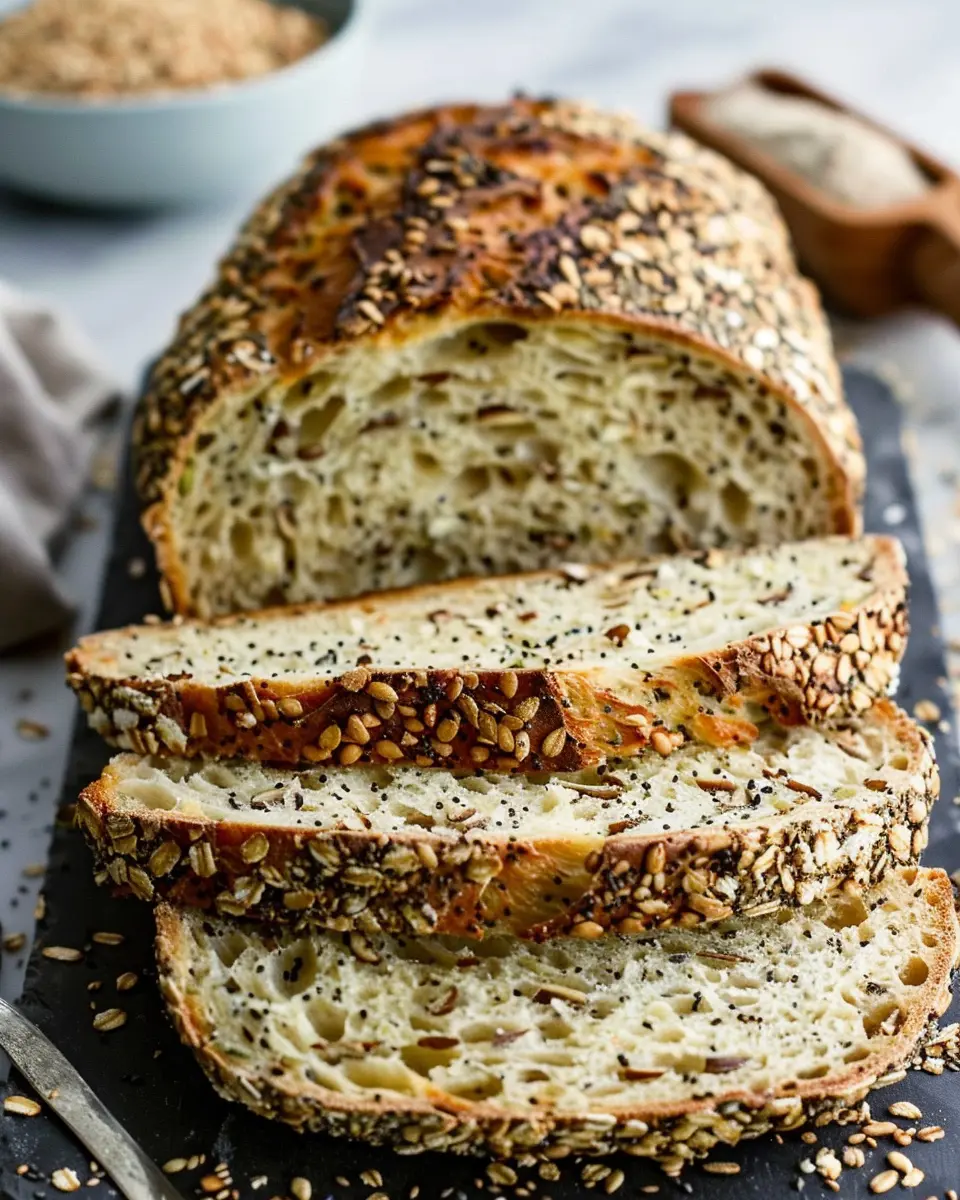
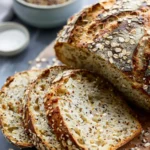
Introduction to No Knead Rustic Seed Bread
Why opt for homemade bread?
Making your own bread isn’t just about enjoying a delicious loaf; it taps into something deeper—a connection to our food. With homemade bread, you have control over the ingredients, ensuring that what you eat is fresh and devoid of unnecessary preservatives. According to a study published by the Harvard School of Public Health, consuming homemade bread can lead to better dietary habits, as you can tailor recipes to your health goals. Imagine standing in your kitchen, surrounded by the comforting aroma of baking bread, knowing you’re nourishing your body with wholesome ingredients.
A key benefit of homemade bread is its cost-effectiveness. Store-bought artisanal loaves can cost a pretty penny, but with simple staples like flour, water, and seeds, you can create something that rivals the best bakeries. Plus, there’s just something immensely satisfying about slicing into a loaf you’ve made with your own two hands.
The joy of a no-knead recipe
Have you ever been intimidated by the thought of kneading dough? You’re not alone! Many home cooks shy away from bread-making because they think it requires special skills or equipment. This is where no knead rustic seed bread shines. This method eliminates the labor-intensive kneading, making it accessible for everyone, even those with a busy lifestyle. All it takes is a bit of patience and a few simple techniques.
The beauty of a no-knead recipe lies in its simplicity. You mix your ingredients, let them rest, and let time do the work for you. The long rising time enhances the flavor and texture, producing a crusty exterior and a soft, chewy interior that’s simply irresistible. It’s like having a warm hug from your kitchen.
With the right seeds—think sunflower, flax, or pumpkin—you can boost the nutritional value of your no knead rustic seed bread, contributing healthy fats, fiber, and protein. The combination of flavors creates a loaf that pairs perfectly with anything, from your morning avocado toast to a hearty turkey bacon sandwich.
If you’re curious to learn more about the health benefits of whole grains, check out this resource from the Whole Grains Council. By embracing this easy recipe, you’re not just baking; you’re creating a nourishing experience that delights the senses and warms the heart. Ready to dive in? Let’s get baking!
Ingredients for No Knead Rustic Seed Bread
Essential ingredients for a perfect loaf
Creating the delightful no knead rustic seed bread starts with some fundamental ingredients. Here’s what you’ll need:
- All-purpose flour: 3 cups, providing the bread with its structure.
- Whole wheat flour: 1 cup, adding a nutty flavor and health benefits.
- Warm water: 2 ½ cups, activating the yeast for a perfect rise.
- Instant yeast: 1 teaspoon, ensuring a fluffy texture without the fuss of kneading.
- Salt: 2 teaspoons, enhancing the natural flavors of the bread.
- Mixed seeds (e.g., sunflower, pumpkin, flax): 1 cup for that rustic crunch and added nutrition.
Feeling adventurous? You can find more about the health benefits of seeds here.
Optional ingredients for customization
Want to make your no knead rustic seed bread even more unique? Here are a few ideas:
- Honey or maple syrup: For a touch of sweetness.
- Olive oil: 2 tablespoons for richness and moisture.
- Dried herbs: Such as rosemary or thyme for aromatic flavor profiles.
- Cheese: Adding a handful of grated cheese can take this bread over the top.
Feel free to mix and match these optional ingredients to reflect your taste! Who knew homemade bread could be so customizable? Happy baking!
Step-by-step Preparation of No Knead Rustic Seed Bread
Making your own bread can feel daunting, but with this no knead rustic seed bread recipe, you’ll discover how easy and rewarding it can be. It’s all about patience and the right technique. This bread is not only delicious but also packed with various seeds, giving it a rich texture and flavor. Ready to become a bread baking pro? Let’s dive in!
Gather and combine your dry ingredients
The first step in your no knead rustic seed bread journey is to gather all your dry ingredients. Here’s what you’ll need:
- 3 cups all-purpose flour
- 1 cup bread flour
- 1 teaspoon salt
- 1/4 teaspoon instant yeast
- 1/4 cup of mixed seeds (like sunflower, pumpkin, or sesame)
In a large mixing bowl, combine the flours, salt, and instant yeast. Make sure to whisk them together until everything is blended well. The mixing of these dry ingredients is essential; it ensures a consistent rise. It’s an excellent opportunity to sneak a taste of your seed mix—who doesn’t love a little nibble?
Incorporate the water
Next up, it’s time to add the magic ingredient: water! You’ll need about 1 3/4 cups of lukewarm water. Pour it into the bowl with your dry ingredients.
- Mix everything with a sturdy spatula or wooden spoon until a shaggy dough forms. It might look a little messy, but don’t worry—that’s meant to happen!
This isn’t your typical bread dough; it’s more of a wet, sticky mass, which is exactly what we want for a no knead rustic seed bread.
The long proofing process
Now comes the most important part—patience! Cover your bowl with a damp cloth or plastic wrap, and let the dough relax at room temperature for 12 to 18 hours.
Why so long? This slow fermentation process develops flavor and enhances the bread’s texture. Think of it as your dough sitting in a luxury spa, rejuvenating and preparing itself for the oven.
If you’re wondering if the dough is ready, it should have doubled in size and be bubbly on the surface.
Shape your loaf
Once your dough has risen beautifully, it’s time to shape it into a loaf. Dust your work surface with a little flour, then gently scrape the dough out of the bowl.
- With floured hands, fold the edges towards the center and shape it into a round loaf.
- Be gentle; you don’t want to deflate all those lovely air bubbles you cultivated during the proofing.
After shaping, let it rest for about 30 minutes while you prepare for the baking.
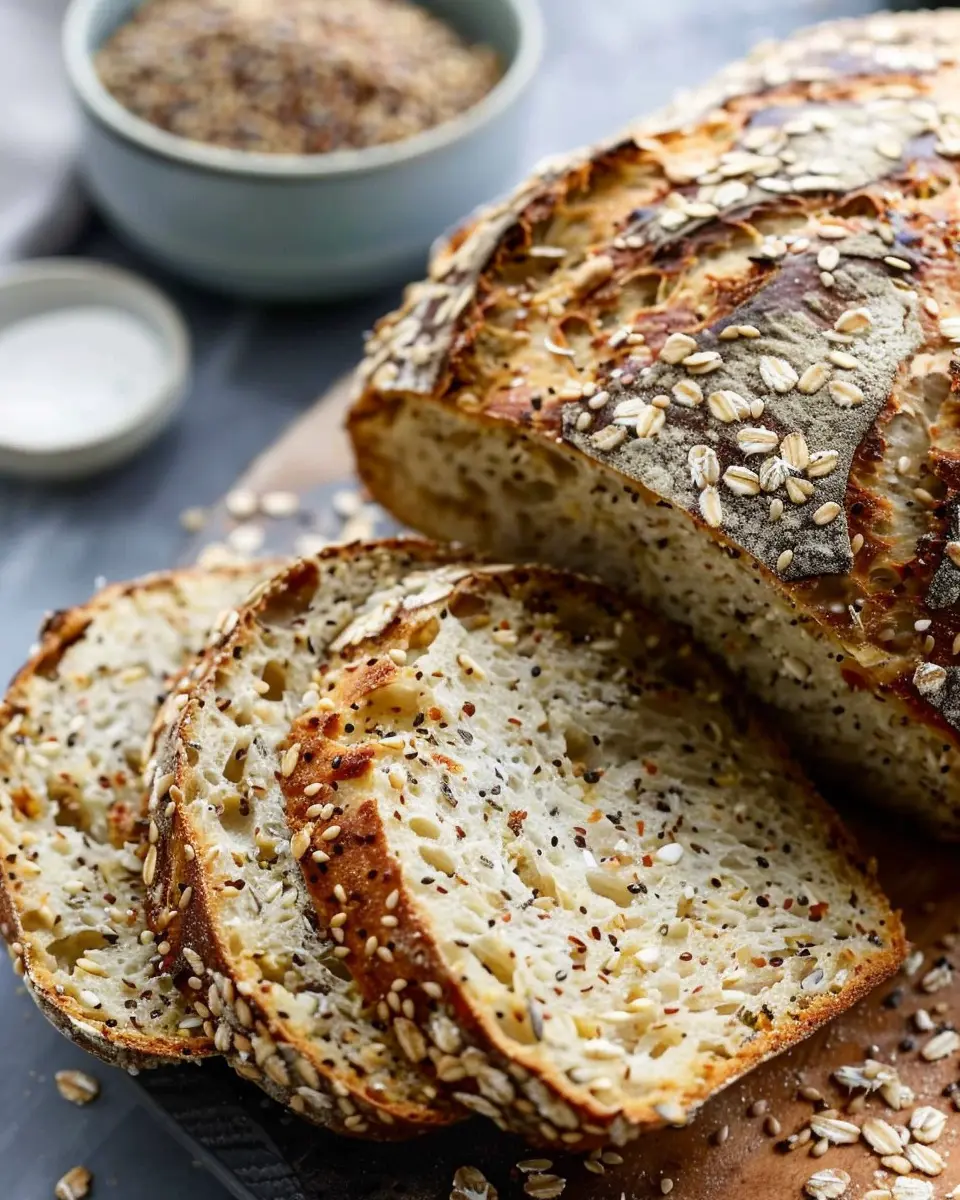
Seed the crust
Here’s where you can get creative! Before baking, you’ll want to add some seeds on the crust to give it a flavorful finish.
- Lightly moisten the top of your dough with water and sprinkle a generous handful of your seed mix over the surface.
- Gently press the seeds down so they stick.
This not only adds texture but also makes your loaf look gorgeous. You can alternate seeds based on your preference or what you have on hand.
Preheat your Dutch oven
It’s time to prepare for baking. About 30 minutes before you’re ready to bake, place your Dutch oven in the oven and preheat it to 450°F (232°C).
Why a Dutch oven? The heavy, lidded pot creates a steam chamber that ensures a beautifully crusty exterior while keeping the bread moist inside.
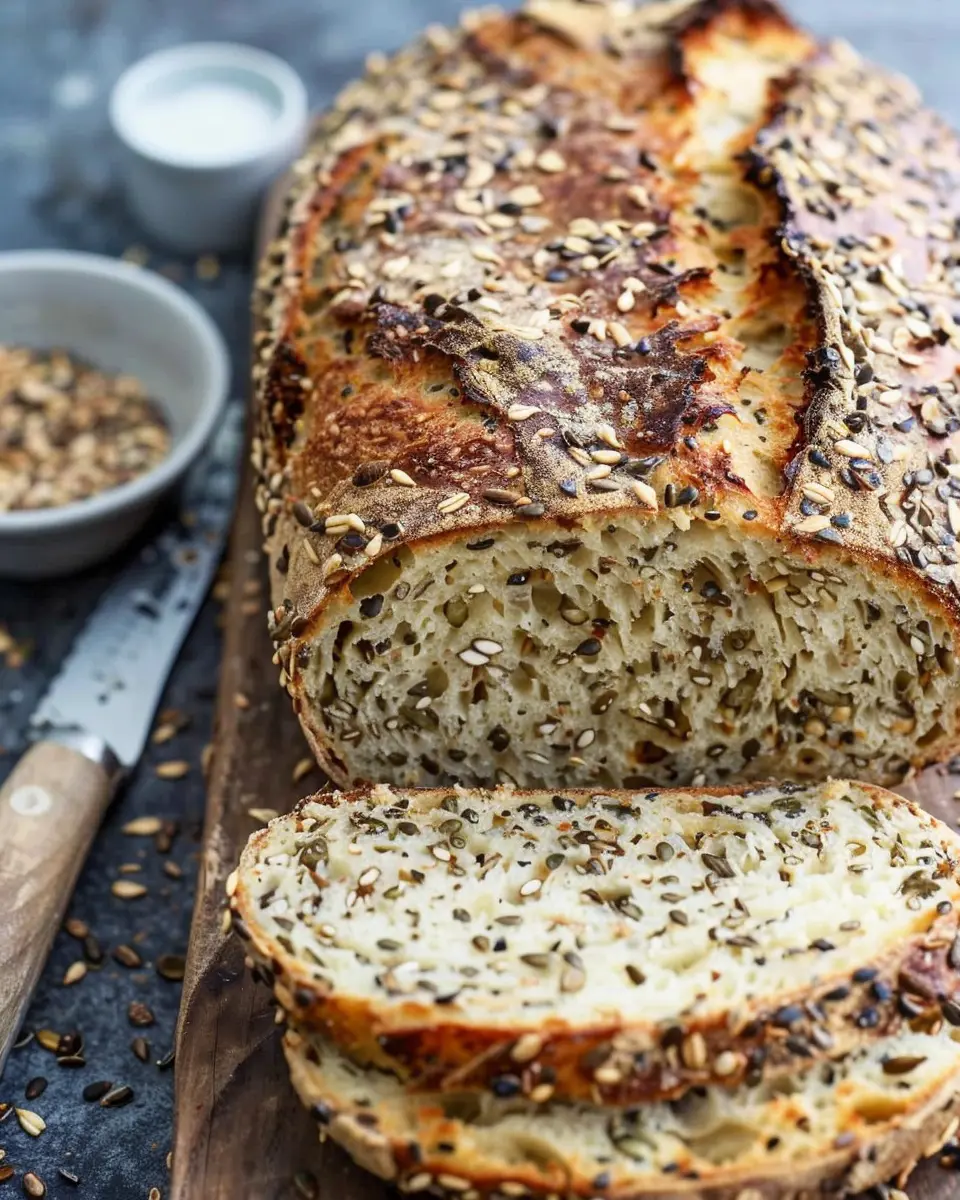
Score and bake the bread
Once your pot is preheated, carefully remove it from the oven. This is where the real show begins!
- Use a sharp knife or a bread lame to score an “X” or a simple slash on the top of your loaf. This allows the bread to expand while baking and creates beautiful steam pockets.
- Gently place the dough into the hot Dutch oven, cover, and bake for 30 minutes.
After 30 minutes, remove the lid to let the crust develop. Bake for an additional 15 to 20 minutes until the bread is golden brown and sounds hollow when tapped on the bottom.
And there you have it! Your no knead rustic seed bread is ready to be enjoyed. Let it cool slightly before slicing. Trust me, the aroma alone will make your kitchen feel like a bakery! Don’t forget to slather on some butter or enjoy it alongside your meals. Happy baking!

Variations of No Knead Rustic Seed Bread
Add herbs for flavor
When your no knead rustic seed bread comes out of the oven, you might want to spice things up. Adding herbs can elevate your bread from delicious to utterly irresistible. Imagine the aroma of fresh rosemary or thyme wafting through your kitchen as it bakes. Not only do herbs add fragrance, but they also contribute a delightful depth of flavor. Try mixing in a tablespoon of dried basil, oregano, or even some minced garlic before you let your dough rest. These simple additions transform your basic bread into a standout side for soups or salads. For more ideas on using herbs in baking, check out this herb guide.
Experiment with different seed mixtures
The beauty of a no knead rustic seed bread lies in its versatility, especially when it comes to seeds. While sunflower and pumpkin seeds are commonly used, don’t hesitate to get creative. What about incorporating flaxseeds for a nutty flavor or chia seeds for added texture? You could also toss in some sesame or poppy seeds for a delightful crunch. Aim for a mix of 1 to 1.5 cups of seeds in your dough; you’ll be amazed at how they contribute to both taste and nutritional value. It’s a fantastic way to sneak in some healthy fats and fiber while still enjoying that comforting, rustic bread experience.
By experimenting with herbs and seeds, you can tailor your no knead rustic seed bread to match your personal preferences, whether you enjoy a savory twist or a nutty crunch. Happy baking!
Cooking Tips and Notes for No Knead Rustic Seed Bread
Troubleshooting Sticky Dough
If your no knead rustic seed bread dough feels too sticky, don’t panic! Here are a few quick fixes to get you back on track:
- Adjust Flour: Sometimes, adding a bit more flour can help. Begin with a tablespoon at a time until the dough reaches a manageable consistency.
- Use Wet Hands: Coat your hands with water or oil to prevent sticking while shaping the dough.
- Prepping Your Surface: Dust your work surface with flour before handling the dough to minimize stickiness without altering the dough’s hydration.
Importance of Proper Proofing
Proper proofing is vital for achieving that perfect rise and texture. Here’s what to keep in mind:
- Timing Matters: Let your dough rest for at least 12 to 18 hours. This long fermentation time allows for flavor development and improves the crust.
- Room Temperature: Ensure your dough is kept in a warm, draft-free area. Cold temperatures can slow down fermentation.
- Check for Bubbles: Before baking, look for bubbles on the surface — a sign that your dough is ready.
By following these tips, you’re well on your way to enjoying delicious homemade no knead rustic seed bread. Remember, practice makes perfect! For more bread-making insights, check out resources like King Arthur Baking and The Fresh Loaf for expert advice.
Serving Suggestions for No Knead Rustic Seed Bread
Perfect pairings for breakfast and brunch
Start your day off right with a slice of no knead rustic seed bread toasted to perfection. This bread boasts a delightful crunch and nutty flavor that pairs well with various toppings! Try spreading a creamy layer of avocado, sprinkled with sea salt and a splash of lemon for a refreshing breakfast. Alternatively, consider melting some sharp cheddar cheese or slathering on your favorite nut butter for a quick, satisfying meal. For a bit of sweetness, a drizzle of honey or jam can elevate your morning routine.
Creative uses in sandwiches
Elevating your lunchtime sandwich game? No knead rustic seed bread is your best ally! Whether you’re building a classic turkey bacon and lettuce sandwich or layering slices of chicken ham, this bread’s robust texture holds up beautifully without getting soggy. For a gourmet twist, why not make a hearty sandwich with roasted vegetables and hummus? Don’t forget to explore other combinations like Greek-inspired feta, olives, and sun-dried tomatoes. With its versatility, you can’t go wrong.
For additional ideas on how to integrate unique flavor combinations into bread-based meals, check out this great resource.
Time Breakdown for No Knead Rustic Seed Bread
When you’re ready to dive into making no knead rustic seed bread, it’s helpful to understand the timing involved. Here’s how you can break it down:
Preparation Time
Getting started takes about 15 minutes. You’ll mix your flour, seeds, and water, creating a sticky dough that requires no kneading! This short prep time means you can fit baking into even the busiest of schedules.
Proofing Time
Let your delicious dough work its magic during the 12–18 hours of proofing. This lengthy period allows the flavors to develop beautifully. You can even make it overnight, so it’s ready for baking in the morning.
Total Time
From start to finish, you’re looking at around 12–18 hours and 45 minutes. The majority is hands-off proofing, which means you can take care of other things while your no knead rustic seed bread is coming to life!
By planning ahead, you can seamlessly incorporate this bread into your routine. For some helpful tips on dough management and flavor enhancement, check out King Arthur Baking or The Kitchn!
Nutritional Facts for No Knead Rustic Seed Bread
When it comes to wholesome, satisfying bread, no knead rustic seed bread is a favorite among many. Let’s break down its nutritional benefits for those mindful of what they eat.
Calories
A slice of this delightful bread typically contains around 80–100 calories. This makes it an excellent option for those looking to indulge without going overboard.
Fiber Content
One of the best features of no knead rustic seed bread is its fiber content. With seeds like flax, sunflower, and pumpkin, each slice offers about 2–3 grams of fiber. This helps keep you full longer while promoting healthy digestion.
Protein
Incorporating quality protein sources, this bread delivers approximately 3–4 grams of protein per slice. It’s a great addition to a balanced diet, especially when topped with turkey bacon or some chicken ham for a delicious brunch.
For more on the importance of fiber in your diet, check out Healthline. If you’re looking to maximize your nutrition, consider pairing it with avocado or nut butter for a delicious meal.
FAQs about No Knead Rustic Seed Bread
Can I use whole wheat flour?
Absolutely! Substituting whole wheat flour in your no knead rustic seed bread will not only give it a heartier flavor but will also boost its nutritional profile. Experiment with a 50/50 blend of whole wheat and all-purpose flour if you’re looking for a lighter texture while still enjoying the benefits of whole grains. Whole wheat flour typically absorbs more water, so you might need to adjust your hydration slightly to maintain that perfect dough consistency.
How do I store homemade bread?
Storing your delicious, homemade no knead rustic seed bread is simple. For short-term storage, place the bread in a paper bag or wrap it in a clean kitchen towel. This method allows for breathability, which helps prevent mold. If you’re looking to keep it fresh for longer, consider slicing the bread, placing it in an airtight container, and freezing it. When you’re ready to enjoy, simply toast the slices or let them thaw at room temperature.
How can I tell if the bread is done baking?
Knowing when your no knead rustic seed bread is ready can be tricky, but there are a few tricks you can use. First, look for a golden-brown crust—it should be firm and sound hollow when tapped on the bottom. Additionally, inserting a thermometer can be a good idea; the internal temperature should reach around 190°F (88°C). If you’re unsure, err on the side of caution and bake a little longer—better to be safe than sorry when it comes to delivering that ideal texture!
These tips, sprinkled with your own experimentation, can elevate your baking game. For more baking insights, check out resources like the King Arthur Baking Company for expert advice!
Conclusion on No Knead Rustic Seed Bread
Recap the joys of homemade bread
Baking homemade bread is a delightful experience that brings warmth and comfort to our kitchens. The aroma of freshly baked no knead rustic seed bread wafting through your home can uplift your mood and create a welcoming atmosphere. This bread not only satisfies your taste buds but also offers the satisfaction of crafting something delicious from scratch.
Encouragement to try the recipe at home
Why not take a leap and try this recipe at home? It’s incredibly simple and requires minimal effort, making it perfect for busy young professionals. With just a few ingredients, you can impress friends and family while enjoying a slice of your very own artisanal bread. Trust me; you’ll want to share this experience! So gather your ingredients, roll up your sleeves, and let’s create something wonderful together. For more baking tips, check out King Arthur Baking Company for expert advice and inspiration!
PrintNo Knead Rustic Seed Bread: Easy Homemade Comfort for All
A simple and comforting recipe for rustic seed bread that requires no kneading.
- Prep Time: 18 hours
- Cook Time: 50 minutes
- Total Time: 18 hours 50 minutes
- Yield: 1 loaf
- Category: Bread
- Method: No Knead
- Cuisine: American
- Diet: Vegetarian
Ingredients
- 3 cups all-purpose flour
- 1 cup mixed seeds (such as pumpkin, sunflower, and sesame)
- 1 ½ teaspoons salt
- 1 teaspoon instant yeast
- 1 ½ cups warm water
Instructions
- In a large bowl, mix flour, seeds, salt, and yeast.
- Add warm water and stir until well combined.
- Cover the bowl with plastic wrap and let it sit at room temperature for 12-18 hours.
- After the resting period, preheat your oven to 450°F (230°C) with a Dutch oven inside.
- Carefully turn the dough onto a floured surface and shape it into a ball.
- Let it rest for 30 minutes while the oven heats up.
- Once hot, place the dough in the Dutch oven, cover it, and bake for 30 minutes.
- Remove the lid and bake for an additional 15-20 minutes until golden brown.
- Let it cool on a wire rack before slicing.
Notes
- For a finer crumb, allow the bread to rest for the full 18 hours.
- Experiment with different seed mixtures to customize the flavor.
Nutrition
- Serving Size: 1 slice
- Calories: 180
- Sugar: 0g
- Sodium: 300mg
- Fat: 4g
- Saturated Fat: 0.5g
- Unsaturated Fat: 3g
- Trans Fat: 0g
- Carbohydrates: 32g
- Fiber: 4g
- Protein: 6g
- Cholesterol: 0mg