Outline for Crusty Italian Bread (2,000 words)
When it comes to baking, few things are quite as satisfying as pulling a golden, crusty Italian bread loaf out of the oven. Not only does the aroma fill your kitchen with warmth and comfort, but the crusty exterior and soft, airy interior are the perfect canvas for countless toppings—be it a simple smear of olive oil or a hearty layer of Turkey Bacon and spinach.
To help you achieve that perfect crusty Italian bread texture that you’ve been dreaming about, we’ve put together a comprehensive outline for the recipe we’ll be sharing later on. It’s designed to guide you through each step of the process, from selecting the best ingredients to the final baking tips for that crispy finish.
Understanding the Ingredients
Before you even pick up a mixing bowl, it’s crucial to understand what makes a great bread. Here are the key components of our crusty Italian bread:
- Flour: Look for high-protein bread flour for that ideal chewiness. All-purpose flour can work, but you’ll miss out on that classic texture.
- Water: A must for hydration; use warm water to activate the yeast.
- Yeast: Both active dry yeast or instant yeast will do the trick. Just make sure it’s fresh for a good rise.
- Salt: This is essential not just for flavor, but it also strengthens the dough.
- Olive Oil: A little of this can aid in creating that desirable crust.
For more insights into ingredient choices, check out King Arthur Baking’s guide to baking ingredients.
Preparing the Dough
Now that you’re familiar with the essentials, let’s dive into making the dough. This is the heart of creating your crusty Italian bread:
- Mixing: Combine your ingredients in a large bowl. Use a wooden spoon or your hands to bring them together until fully integrated.
- Kneading: Turn the dough out onto a floured surface and knead for about 10 minutes. You’re looking for a smooth, elastic dough.
- First Rise: Place the dough in a lightly greased bowl, cover it, and let it rise in a warm place until it doubles in size—this typically takes about an hour.
Remember, patience is a virtue in baking! While the dough is rising, take some time to sip on a nice cup of herbal tea and read a good book.
Shaping the Loaf
Shaping your dough is where you can really let your creativity shine. You can opt for a classic round loaf or a long batard:
- Preshape: Gently deflate your risen dough and let it rest for around 10 minutes.
- Shape: Whether you go round or oval, aim for a tight surface to ensure a good rise.
- Second Rise: After shaping, let the loaf rest and rise another 30-45 minutes.
Feeling unsure about how your loaf should look? Check out some tutorial videos on reputable baking blogs to see the shaping process in action.
Baking the Bread to Perfection
The moment of truth is here! Baking your crusty Italian bread involves a few key steps:
- Preheat: Always preheat your oven to the highest temperature, ideally around 475°F (245°C).
- Steam: To develop that gorgeous crust, use a pan with boiling water at the bottom of the oven or mist the loaf with water as soon as it goes in.
- Bake Time: Generally, your bread will need around 25-30 minutes. You want it to have a nice golden-brown color and sound hollow when tapped.
Bakeries often invest in steam ovens to achieve that signature crust hydration. If you can’t afford one, this steam method is a fantastic alternative!
Cooling and Storing
Once your crusty Italian bread is out of the oven, let it cool for a bit (if you can resist slicing into it right away):
- Cooling: Place it on a wire rack to prevent sogginess and allow air circulation.
- Storing: Bread is best enjoyed fresh, but if you need to store it, keep it in a paper bag for a day or two, or freeze slices for longer-term preservation.
Tips for Success
As with any recipe, we like to share our favorite tips and tricks that we’ve learned along the way. Here are a few bonus inclusions:
- Practice Makes Perfect: Don’t fret if it doesn’t turn out perfectly the first time. Each loaf is a chance to improve.
- Use Quality Ingredients: Higher-quality flour and olive oil can significantly impact the end product.
- Experiment with Flavors: Consider adding herbs, garlic, or even cheese to the dough for an exciting twist.
Enjoying Your Bread
Once baked and cooled, the ways to utilize your crusty Italian bread are limitless:
- Sandwiches: Layer it up with Turkey Bacon, spinach, and your favorite spread for a mouth-watering lunch.
- Bruschetta: Top slices of the bread with diced tomatoes, basil, and a drizzle of olive oil for a delightful starter.
- French Toast: Leftover bread? Slice it and dip it for a delicious breakfast option.
As you experiment, keep a notebook to jot down what worked for you—after all, every baker has their own personal touch!
Concluding Thoughts
Baking crusty Italian bread not only fills your home with comforting scents but also provides an opportunity to connect with culinary traditions. Understanding the process and ingredients can lead to consistent results and endless creativity in your kitchen.
So, gather your ingredients, roll up your sleeves, and get ready to bake your way to a beautifully crusty loaf that’s sure to impress! Who knows? You may just become the go-to bread baker among your friends!
Want to explore more about fine baking techniques? Check out experts like The Bread Lab for innovative insights into the art of bread making. Happy baking!
Introduction to Crusty Italian Bread
Why bake bread at home?
Baking bread at home is more than just a culinary task; it’s a rewarding experience that ignites your senses. The process offers a unique blend of creativity and functionality. Did you know that a recent survey found that over 66% of people find baking at home to be a form of relaxation? Making crusty Italian bread not only fills your kitchen with an irresistible aroma but also allows you to customize flavors and ingredients to suit your taste. Plus, there’s something incredibly satisfying about watching a simple mixture of flour, water, and yeast transform into a beautiful loaf.
The charm of crusty Italian bread
What makes crusty Italian bread so enchanting? It’s the perfect combination of a golden, crunchy exterior that gives way to a soft, airy interior. This type of bread embodies tradition and warmth, often enjoyed with meals or as a standalone snack. According to food historians, the origin of Italian bread dates back centuries and reflects regional nuances—from ciabatta to focaccia. You can explore more about these varieties on platforms like The Spruce Eats.
Imagine tearing off a piece of freshly baked loaf, its crust crackling beneath your fingers, and pairing it with your favorite dips or toppings. It’s this kind of comforting experience that keeps you coming back for more.
My first baking experience
Looking back, I remember the day I decided to make my first loaf of bread—it was a rainy Saturday afternoon. With little more than some flour and yeast, I felt adventurous. The dough was sticky and tricky, but every second spent kneading it felt rewarding. After patiently waiting for it to rise, I slid my loaf into the oven, anticipation bubbling within me.
When it finally emerged, with that beautiful golden crust, I couldn’t help but smile. I slathered butter on a warm piece and shared it with friends, who were as amazed at my success as I was. That loaf not only satisfied our hunger but also sparked a journey of culinary exploration that I cherish to this day.
Join me as we dive into the world of crusty Italian bread, and get ready to bake the perfect loaf together!
Ingredients for Crusty Italian Bread
Essential ingredients list
To achieve that irresistible crusty Italian bread you crave, you’ll need the following simple yet high-quality ingredients:
- Bread flour: Provides the structure and chewiness.
- Water: Must be warm to activate the yeast effectively.
- Active dry yeast: The leavening agent that makes the bread rise.
- Salt: Enhances flavor and strengthens the dough.
- Olive oil: Adds richness and maintains moisture.
Importance of quality ingredients
Using quality ingredients is crucial for a successful loaf. For instance, opting for unbleached bread flour ensures better gluten formation, resulting in that delightful crust. Fresh yeast versus older yeast can significantly impact your bread’s rise. Always check expiration dates on your yeast for optimal results. Want to dive deeper into the science of baking? Check out resources like King Arthur Baking.
Alternatives for common ingredients
Don’t worry if you’re missing something! Here are some handy substitutions:
- Bread flour: You can use all-purpose flour, but expect a slightly different texture.
- Olive oil: Can be replaced with vegetable oil or melted butter if desired.
- Active dry yeast: Instant yeast works just as well; simply adjust the rising time.
With these tips, you’ll be set to make crusty Italian bread that’s sure to impress!
Step-by-Step Preparation of Crusty Italian Bread
Baking crusty Italian bread at home is not just a task—it’s a delightful experience! Follow these steps to achieve the perfect loaf that will make your kitchen smell divine. Let’s get our hands floury!
Prepare the yeast mixture
Start off by activating the yeast. In a large bowl, combine:
- 1 packet (2 ¼ teaspoons) of active dry yeast
- 1 cup of warm water (about 110°F)
Let it sit for about 5-10 minutes until it becomes frothy. This indicates that the yeast is alive and kicking, perfect for making that airy and chewy texture we’re aiming for.
Combine dry ingredients
In another bowl, mix together the dry ingredients:
- 4 cups of all-purpose flour
- 2 teaspoons of salt
You might be tempted to skip the salt, but don’t—it’s essential for flavor and helps control the yeast’s activity. After mixing, do a little happy dance and revel in the anticipation of the crusty Italian bread that awaits!
Form the dough
Once your yeast has come alive, gradually add the flour mixture to the yeast mixture. Use a wooden spoon or your hands to bring it together until a shaggy dough forms. This part can get a bit messy, but that’s half the fun!
Knead until smooth and elastic
Transfer the dough onto a floured surface and get ready to knead! Knead the dough for about 10 minutes, or until it becomes smooth and elastic. This motion helps develop gluten, which is crucial for your bread’s structure. If you’ve never kneaded before, think of it as a mini workout—there’s nothing quite like the feeling of getting your hands in the dough.
First rise – letting the dough rest
Once kneaded, shape your dough into a ball and place it in a greased bowl. Cover it with a damp cloth or plastic wrap. Allow it to rise in a warm place for about 1-2 hours, or until it doubles in size. This is where the magic happens!
Shaping the loaf
After the dough has risen, punch it down gently to release the air. Turn it onto a lightly floured surface and shape it into your desired loaf form. Whether you prefer a round boule or a classic loaf shape, this is your chance to get creative.
Second rise – letting it grow again
Place your shaped loaf onto a baking sheet lined with parchment paper. Cover it again with a cloth and let it rise for another 30-60 minutes. This second rise adds even more airy quality to your crusty Italian bread.
Preheat and prepare the oven
While your dough is working its magic, preheat your oven to 450°F. Place a cast iron skillet or a metal pan on the bottom rack; we’ll use this to create steam in the oven, which is crucial for that crusty exterior.
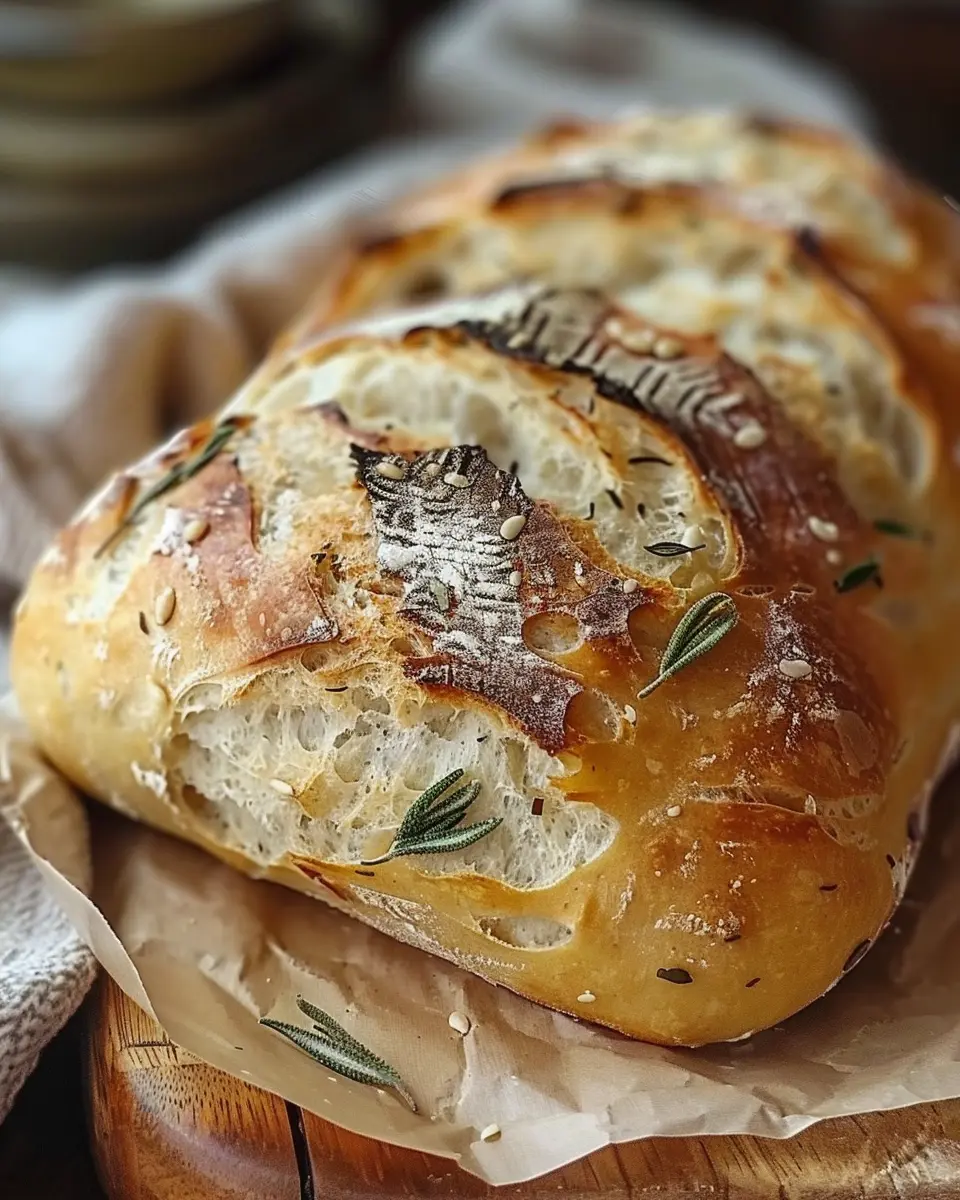
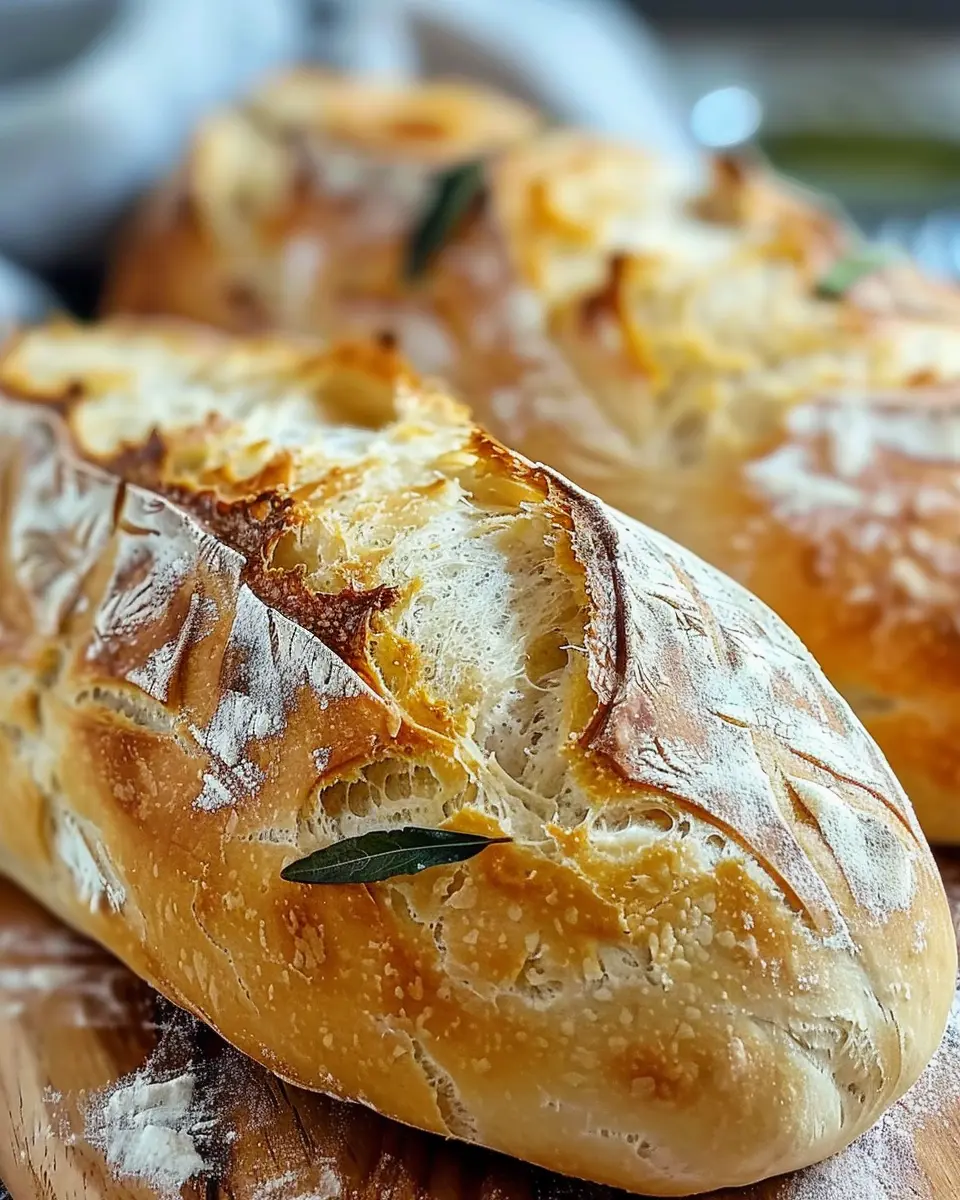
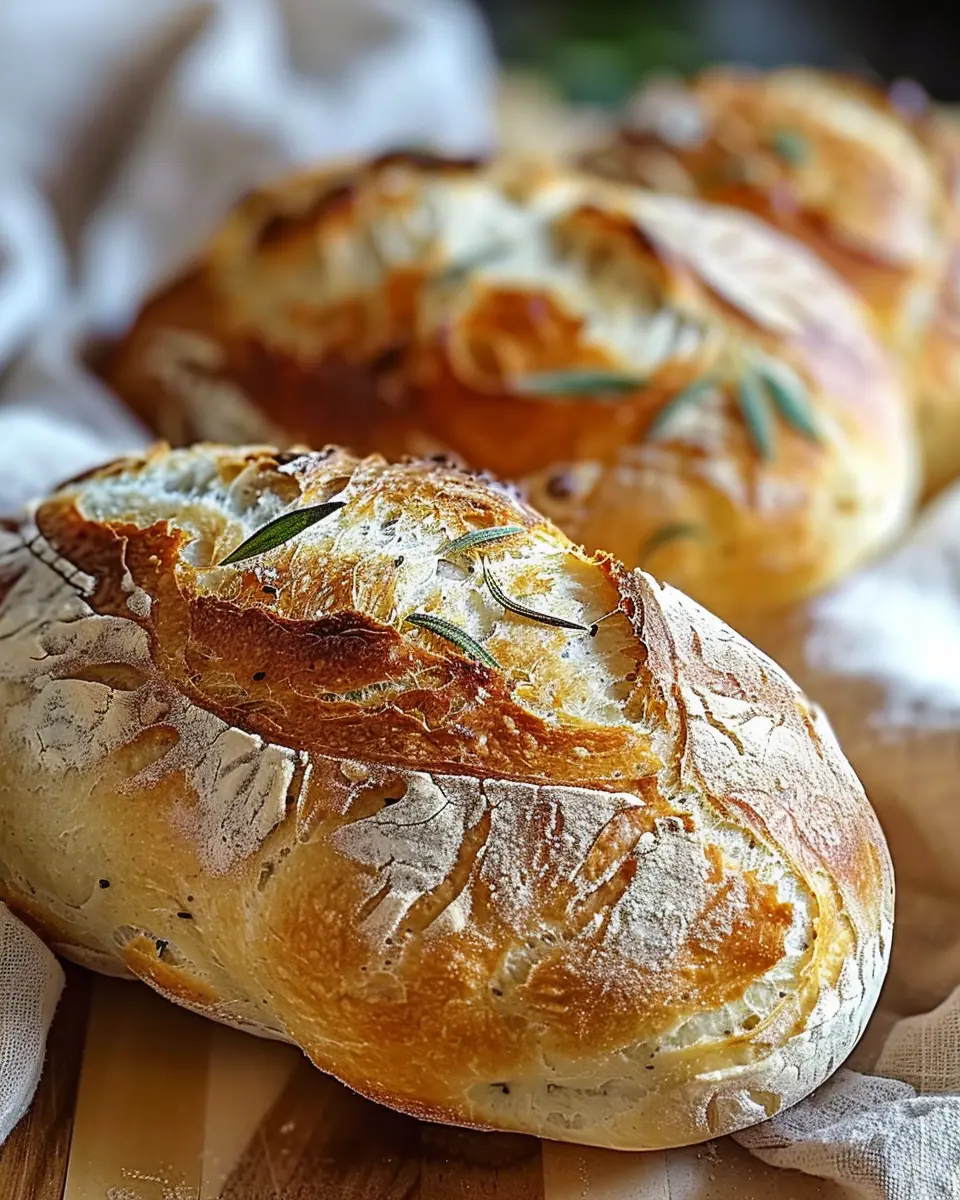
Scoring the bread
Once the dough has completed its second rise, gently score the top with a sharp knife. This allows the bread to expand during baking without bursting in unexpected places. Plus, it gives your loaf a beautiful, rustic appearance.
Baking to perfection
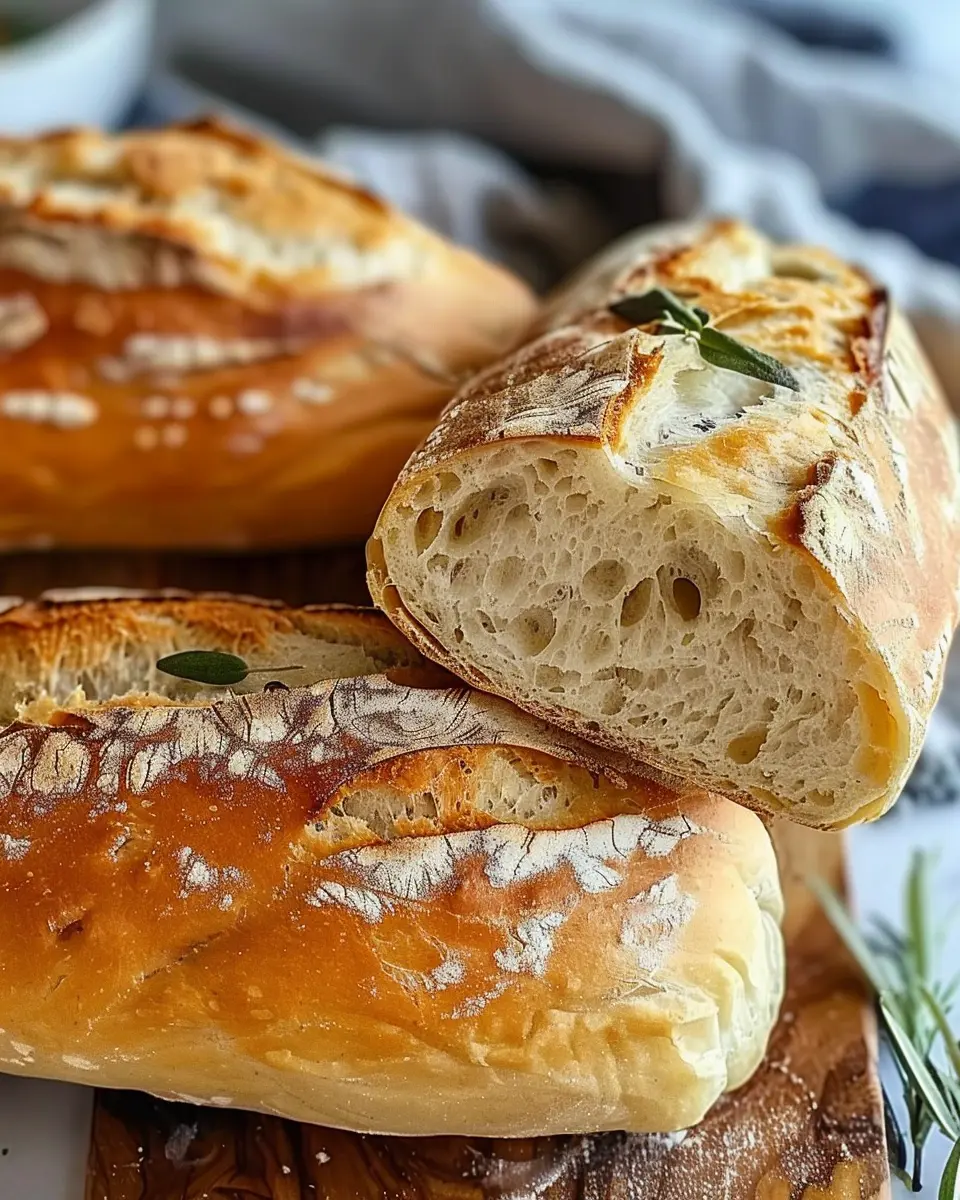
Now comes the exciting part—baking! Carefully place your loaf in the oven and pour a cup of hot water into the skillet below. The steam created will help develop that characteristic crust. Bake for about 25-30 minutes or until the bread is golden brown and sounds hollow when tapped on the bottom.
And there you have it! Let your crusty Italian bread cool on a wire rack before slicing. Trust me, the aroma will fill your home, drawing in anyone nearby. Enjoy with a drizzle of olive oil or alongside your favorite soup!
For more baking tips and tricks, check out resources like King Arthur Baking and The Bread Lab. Happy baking!
Variations on Crusty Italian Bread
Crusty Italian bread is incredibly versatile, and you can tailor your loaf to suit different tastes and occasions! Let’s explore some delightful variations that can elevate your baking experience.
Herbs and spices for flavor
Why stick to plain when you can infuse your crusty Italian bread with aromatic herbs and spices? Consider adding:
- Oregano: A classic choice that brings a touch of Mediterranean magic.
- Rosemary: Offers a fragrant kick that pairs perfectly with olive oil.
- Garlic powder: A pinch adds depth and may even keep vampires at bay!
Experimenting with a blend of these spices can transform an everyday loaf into a flavor explosion. You might even consider a parsley or basil addition for a fresh garden taste.
Cheese-stuffed crusty bread
Who doesn’t love cheese? Imagine the joy of pulling apart a loaf only to discover gooey, melted cheese inside. Try incorporating:
- Mozzarella for that classic Italian flavor.
- Parmesan for a sharper bite.
- Ricotta mixed with herbs for a creamy surprise.
To create this cheesy delight, simply shape your dough around the cheese before the final rise. It’s a surefire crowd-pleaser for any gathering.
Multigrain Italian bread
For health-conscious bakers, a multigrain variation offers nutty flavors and added nutrients. Mixing different flours, such as whole wheat, spelt, and oat, not only enhances the texture but also provides dietary benefits, including increased fiber. Check out WholeGrainsCouncil.org for more insights on the benefits of whole grains.
Each of these variations on crusty Italian bread invites you to explore and enjoy the baking journey. So, why not roll up your sleeves and try one today? You might just discover your next favorite loaf!
Cooking Tips and Notes for Crusty Italian Bread
Secrets to a Perfect Crust
Achieving that perfect crust on your crusty Italian bread involves a few key steps. First, the steam is essential! Place a baking dish filled with hot water in your oven while the bread bakes. This moisture helps create that beautiful, crispy outer layer we all adore. Also, don’t forget to score the top of your dough; it allows for expansion and creates an aesthetically pleasing design.
How to Avoid Common Mistakes
Many home bakers struggle with under-proofing their dough, which can lead to dense bread. Give your dough ample time to rise until it doubles in size. Use a digital thermometer to check for internal temperature. A perfect loaf should be around 200°F (93°C) when done. Don’t rush the rising or baking processes; patience is key!
Storing Your Homemade Bread
To keep your crusty Italian bread fresh, avoid the refrigerator, as it can dry out your loaf. Instead, store it in a paper bag at room temperature for up to three days. For longer storage, consider slicing and freezing it. Just wrap each piece well in plastic wrap and place it in a freezer bag; it will stay fresh for up to three months. Want tips on freezing bread effectively? Check out this guide!
Using these tips will elevate your homemade crusty Italian bread, making your baking experience more enjoyable and rewarding!
Serving Suggestions for Crusty Italian Bread
Perfect Pairings: What to Serve With It
Crusty Italian bread shines when paired with simple yet delicious accompaniments. Think about serving it alongside:
- Fresh olive oil and balsamic vinegar for dipping. The interplay of flavors is divine!
- Savory spreads like roasted garlic or herb-infused cream cheese add a delightful twist.
- Chicken ham and turkey bacon sandwiches elevate the experience, offering a satisfying protein boost.
For those looking for vibrant and nutritious sides, consider a salad bursting with seasonal veggies or a rich tomato soup. These complement the bread’s crusty texture effortlessly.
Creative Uses for Leftover Bread
Don’t let any slices go to waste! Transform leftover crusty Italian bread into:
- Crunchy croutons by tossing cubes with olive oil, garlic, and herbs, then baking until golden.
- Bread pudding for a sweet dessert—just combine with milk, eggs, and your favorite spices.
- Bruschetta for a delightful appetizer, topped with diced tomatoes, basil, and a sprinkle of salt.
Bread as a Centerpiece in Meals
Imagine placing a beautiful loaf of crusty Italian bread at the center of your dinner table. Not only does it look appealing, but it’s also an invitation for guests to dig in. Serve it with a hearty stew or a charcuterie board loaded with cheeses, fruits, and cured meats like beef salami. This approach creates a communal dining experience that everyone loves.
For more inspiration on how to maximize your Italian bread, check out this article on creative bread uses for some fantastic ideas!
Time Breakdown for Baking Crusty Italian Bread
Preparation Time
Getting started with your crusty Italian bread takes about 20 minutes. This is when you’ll gather your ingredients, mix the dough, and get it into its first rise. Make sure to have all your essentials on hand, like flour, yeast, water, and salt, for a smooth process.
Rising Time
The magic truly happens during the rising phase, which can take about 1.5 to 2 hours. This is your opportunity to relax—maybe browse through some cooking tips or a fun food blog!
Baking Time
Once your dough has risen, it’s time to bake. Expect around 30 to 40 minutes in the oven for that perfect crust. Keep an eye on it—your nose will tell you when it’s close!
Total Time
Add it all up, and you’re looking at a total of approximately 2 to 2.5 hours. Just think, in no time, you’ll have your very own crusty Italian bread to enjoy fresh from the oven. Happy baking!
Nutritional Facts for Crusty Italian Bread
Calories and Serving Size
When it comes to crusty Italian bread, a single slice (about 28 grams) typically contains around 80-100 calories. This can vary based on the exact ingredients and preparation methods used in your recipe. Many enjoy indulging in a hearty slice and may find they easily consume two or three slices, so it’s good to keep portion sizes in mind, especially if you’re monitoring your intake.
Key Nutrients
This classic bread is a source of essential nutrients, including:
- Carbohydrates: A primary energy source.
- Protein: Vital for muscle repair and growth.
- Fiber: Aids digestion (look for whole grain variations for added benefits!).
A loaf of crusty Italian bread can be paired wonderfully with salads, soups, or your favorite spreads, enhancing your meals nutritionally.
Tips for Healthier Choices
- Opt for Whole Grain: Choose whole grain flour to increase fiber content and improve satiety.
- Watch Portions: Stick to the recommended serving size to enjoy without the excess calories.
- Add Toppings Wisely: Consider topping with avocado or hummus for healthier fat and protein options instead of butter.
For more detailed nutritional information, check out resources like USDA Food Data Central or NutritionData. Enjoy your baking journey and relish the delicious flavors of homemade crusty Italian bread!
FAQs about Crusty Italian Bread
Baking crusty Italian bread at home can be a delightful experience, but you might have some questions along the way. Here are answers to some of the most frequently asked questions to help you on your baking journey!
How do I know when my bread is done?
Determining if your crusty Italian bread is fully baked can be quite simple. Here are a few tips:
- Tap test: Gently tap the bottom of the loaf; it should sound hollow if it’s done.
- Internal temperature: Use a kitchen thermometer; aim for about 190°F (88°C) for a perfect crusty exterior and soft interior.
Observing these indicators will help ensure you enjoy a perfectly baked loaf! For more tips on baking bread, check out resources from King Arthur Baking.
Can I freeze crusty Italian bread?
Absolutely! Freezing is a great way to extend the life of your crusty Italian bread. Here’s how to do it:
- Wrap tightly: Use plastic wrap or aluminum foil to wrap your bread, ensuring it’s sealed tightly to avoid freezer burn.
- Storage: Place the wrapped bread in a resealable bag for added protection. It can last up to 3 months in the freezer.
When you’re ready to enjoy it, simply thaw at room temperature or warm it in the oven for a few minutes to refresh that crust.
What can I do if my dough doesn’t rise?
If your dough isn’t rising, don’t worry; it happens to the best of us! Here are some troubleshooting tips:
- Check your yeast: Ensure it’s fresh and active. You can proof it in warm water (about 110°F) with a bit of sugar to see if it bubbles.
- Temperature matters: Make sure your dough is in a warm place to encourage yeast activity; a draft-free area works best.
Don’t be discouraged—baking is as much about learning as it is about creating delicious food! If you’re looking for more baking tips, resources like The Bread Lab can offer extensive guidance.
Conclusion on Crusty Italian Bread
Reflection on the baking journey
Baking crusty Italian bread can be both a challenge and a joy. From mixing flour to the aroma that fills your kitchen, each step offers a moment to reflect on your skills and creativity. Remember, every loaf is a new adventure, and with practice, you’ll discover methods that work best for you.
Encouragement to try baking at home
If you’ve hesitated to embark on this baking journey, now is the perfect time to dive in! Homemade bread not only nurtures your culinary skills but also brings a sense of accomplishment. Imagine pulling a warm loaf from the oven, its crust perfectly golden, ready to be slathered with butter or served alongside your favorite meal.
Final thoughts on embracing homemade food
Embracing homemade food is about more than just nourishment; it’s a celebration of tradition, creativity, and connection. Baking crusty Italian bread at home can become a cherished ritual, bringing friends and family together. So preheat that oven, roll up your sleeves, and enjoy the delightful process of baking! Check out resources from King Arthur Baking for tips and community ideas.
PrintCrusty Italian Bread: Bake the Best Loaf Today at Home
Learn how to bake a crusty Italian bread that is perfect for any occasion. This recipe guarantees a crispy crust and soft interior.
- Prep Time: 15 minutes
- Cook Time: 45 minutes
- Total Time: 12 hours
- Yield: 1 loaf
- Category: Bread
- Method: Baking
- Cuisine: Italian
- Diet: Vegetarian
Ingredients
- 4 cups all-purpose flour
- 1 1/2 cups warm water
- 2 teaspoons salt
- 1 teaspoon active dry yeast
Instructions
- In a large bowl, mix warm water, yeast, and salt. Let it sit for 5 minutes.
- Gradually add flour and mix until a sticky dough forms.
- Cover with a damp cloth and let it rise for 12-18 hours.
- Preheat your oven to 450°F (230°C) with a cast iron pot inside.
- Shape the dough into a ball and let it rest for 30 minutes.
- Carefully place the dough into the hot pot and cover it.
- Bake for 30 minutes, then remove the lid and bake for an additional 15 minutes.
- Let the bread cool before slicing.
Notes
- For a more flavorful bread, let the dough rise for a longer period.
- Use a kitchen scale for precise measurements.
Nutrition
- Serving Size: 1 slice
- Calories: 150
- Sugar: 0g
- Sodium: 300mg
- Fat: 1g
- Saturated Fat: 0g
- Unsaturated Fat: 0g
- Trans Fat: 0g
- Carbohydrates: 30g
- Fiber: 1g
- Protein: 5g
- Cholesterol: 0mg